As an Amazon Associate I earn from qualifying purchases.
To draw wet clothes, emphasize the cling of fabric to the body and the shine where light reflects off the water. Show gravity’s pull, creating darker, more detailed folds at the bottom.
Drawing wet clothes on figures requires a keen observation of how fabric interacts with the human form and elements like water. Capturing the essence of soaked garments begins with understanding their behavior as they adhere to the body, revealing contours and creating distinct visual patterns.
Fabric takes on a heavier appearance when wet, so illustrating its drape and the effects of gravity becomes essential. Reflective highlights suggest moisture, while accentuated shadows enhance the three-dimensional look. Developing this skill set transforms your art, adding realism and dynamism to scenes involving water or rain. By infusing your sketches with these thoughtful details, the viewer can almost feel the dampness and texture of the clothing, elevating the overall impact of your artistic expression.
Introduction To Drawing Wet Clothes
Drawing wet clothes requires observing how water affects fabric. Realistic wet textures offer a dynamic element to artwork, presenting a visual challenge for artists. Noticing the subtle changes in tone, the way light bounces off wet surfaces, and fabric cling are keys to success.
Artists must understand the physics of water and its interaction with different materials. This leads to grasping how water alters the appearance of cloth. Knowing this is crucial for creating believable wet clothing in art.
| Fabric Type | Water Interaction |
|---|---|
| Cotton | Absorbs water, becomes heavier |
| Silk | Water enhances shine, sticks to the body |
| Denim | Becomes darker, stiff with water |

Credit: www.amazon.com
Materials And Tools You Need
Creating realistic wet clothes in drawings demands specific materials and tools. High-quality pencils ensure precise lines and shades. Smooth-textured paper, on the other hand, allows for subtle blending. Soft graphite pencils (B, 2B, or 4B) are ideal for dark, damp areas of the clothing.
Employing blending stumps can achieve the wet look effectively. They help in smoothing out pencil marks. This technique mimics the way light reflects off of wet fabric. Kneaded erasers are excellent for lifting graphite, creating highlights where the clothes appear to cling to the body. For stronger contrasts, use a standard eraser to depict water’s sheen on the fabric.
Understanding Fabric And Wetness
Drawing wet clothes requires understanding different types of fabrics and how water changes their appearance. Cotton becomes darker and sticks closer to the body when wet, showing the body’s form underneath. Wool can look heavier and might not stick as much because it absorbs water well. On the other hand, silk changes its texture and color, becoming more translucent and clinging to the body tightly. To observe these effects accurately, one must study real-life examples, noting how light and shadows interact with the wet material. Watching the way fabric moves and clings to a person can help artists capture the effect of wetness realistically in their drawings.
Credit: www.clipstudio.net
Step-by-step Guideline
Begin with a simple pencil sketch to outline your drawing. Think about the cloth’s shape and how it drapes. Ensure you capture the folds and creases. Use light strokes, allowing room for changes.
Next, start adding shadows to your sketch. These will be the base for your wet clothes effect. Under the darker areas, press your pencil a bit harder. Leave other areas lighter to show dry zones.
Lastly, focus on the highlights and shadows to create realism. Imagine where the light hits and where water might make the cloth stick to the body. With a fine eraser, lift graphite to form shiny wet spots. Contrast these areas with deeper shadows alongside to suggest the fabric is wet.
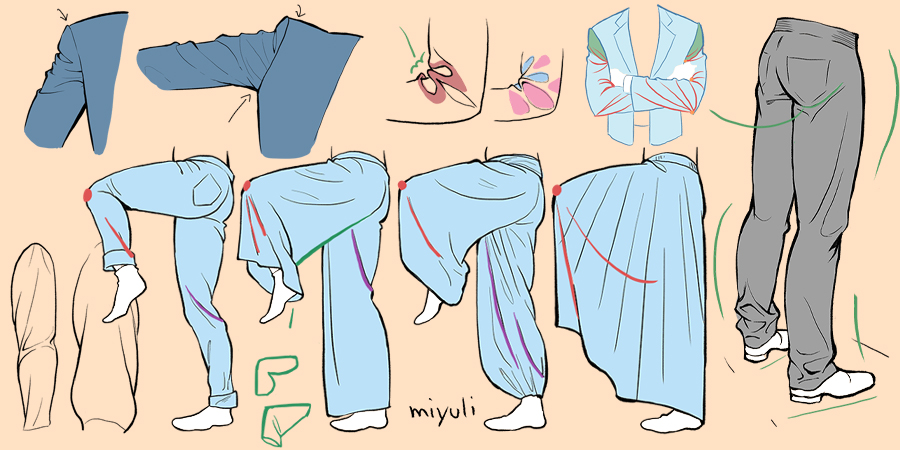
Refining Details For Realism
Drawing wet clothes needs attention to detail. Bold shadows and highlights create a wet look. Use sharp contrasts to mimic the way water affects light.
To show fabric, add lots of small wrinkles. Wet clothes stick to the body, so make the lines curve with the body shape. Showing water droplets falling off adds more realism. Place them randomly and use tiny reflections for realism.
A wet effect needs both smooth and sharp textures. Use a pencil to blend shades for a soft texture. For sharp details, a fine pen works well. This helps to get the texture of wet fabric right.

Credit: medibangpaint.com
Common Mistakes To Avoid
Drawing wet clothes can seem tricky. Light direction plays a key role in how wet fabric looks. Remember, light creates highlighted areas and shadows on the wet material. Not considering this will make your drawing look off.
Wet clothes also hang heavier on the body. They do not float or flap like dry fabric. The weight of water makes the clothes cling and fold differently. Flow of the fabric changes due to the dampness. Ignoring these details might result in unrealistic drawings.
Practice Projects And Exercises
Beginners can start with drawing draped fabrics on simple shapes. Objects like spheres, cubes, and cones will work well. Use these shapes to understand the basics of fabric flow over solid forms. Wet clothes cling tightly to these shapes, showing detailed folds and stretches.
Experiment with shading to give your wet clothing a realistic appearance. Notice how wet fabric gets darker where it is damp. Try using side-by-side comparisons of dry and wet cloth. This method helps to master the differences in texture and color.
More experienced artists can focus on dynamic poses with models in motion. Sporting action or dance movements provide excellent scenarios. Capturing the interaction between clothing and the forces applied by movement highlights an artist’s skill. Use reference images for better accuracy and realism.
Final Touches And Presentation
Spraying a fixative on your wet clothes drawings is crucial. It protects them from smudging and dust. Always use fixatives in a well-ventilated area. Let the drawing dry completely before touching it.
Show your masterpieces in a clean, organized portfolio. Choose one that shield’s from sunlight to prevent fading. A good portfolio will impress others. It keeps your art safe and professional-looking.
Frequently Asked Questions Of How To Draw Wet Clothes
How Do You Make Something Look Wet When Drawing?
To make a drawing look wet, add highlights and reflective streaks for a glossy sheen. Use shading to create the illusion of moisture, and blend colors for a slick appearance. Include dripping elements or puddles for added realism.
How Do You Draw Wet Skin?
To draw wet skin, emphasize glossy highlights where water reflects the most. Blend shades smoothly for a slick appearance. Include droplets with a brighter outline and darker interior. Reflect surrounding colors subtly on the wet areas to simulate moisture’s reflective quality.
Keep contrast high for a realistic effect.
What Can I Use To Draw On Clothes?
You can use fabric markers, fabric paint, or permanent markers to draw on clothes. These tools offer durability and come in various colors for creative designs.
How Do You Draw Clothes For Beginners?
Begin with basic shapes to outline the body. Add lines to represent clothing drape and folds. Sketch the clothing item’s outline, incorporating these folds. Refine details, like seams and patterns. Practice using reference photos for accuracy.
Conclusion
Mastering the art of depicting wet clothes can dramatically elevate your drawings, infusing them with realism and depth. Remember, observing real-life situations helps refine your technique. Keep practicing these steps, explore different fabrics and water effects, and you’ll see your artwork come to life with stunning authenticity.
Happy drawing!
As an Amazon Associate I earn from qualifying purchases.